Wednesday, January 16, 2013

Day Nine: Step One is a Success!

Hello, Blogger world (and Dr. Pittman).

Once again, I must apologize for posting my daily blog one day late.  In my defense, yesterday was a very long day and today I did not work in the lab because I accompanied another Interim group to Duke Energy in Seneca, which was a fantastic experience and has given me some things to consider for my future.  Educational opportunities are everywhere.

Yesterday's process was slow but valuable.  We began by preparing GC samples of our Grignard products - in my case, 2-benzylcyclohexanol.  (Note that this is fairly similar to the standard cyclohexanol that we reacted last week.)

ChemSpider 2D Image | 2-Benzylcyclohexanol | C13H18O 

We added water to our reaction flasks, and two separable layers - liquid and solid - formed. We decanted the top layer into a new RB flask, using a sample of that liquid for our GC scan.  The precipitate was left in the flask.

From the first scan of our samples, we determined that all of the cyclohexene oxide had reacted, because the known peak for that compound was not present in the spectrum.  After that, we ran the same samples through the GC but performed mass spectrometry, as well.  My top match for the product mass was the desired compound - yay!

Having concluded that my product solution contained 2-benzylcyclohexanol, I set the purified solution to dry with magnesium sulfate and turned my attention to the leftover, untested product.  Since we believed that some product might have been trapped in the precipitate, I removed the unreacted magnesium by vacuum filtration and treated the solution with 6-M hydrochloric acid until the solution was no longer basic.  This was to ensure that all of the alcohol was indeed protonated and to make it more ether-soluble than aqueous.  I rinsed the solution with ether and separated the organic product from aqueous.  Tomorrow, we will determine if the two solutions match.

Thus far, the most frustrating part about research is having to wait for results before moving on.  It would have been much more time-efficient to perform the acid workup while the first GC scans were in progress, but then, we may have done more work than was necessary if there hadn't actually been desired product in our samples.  There is a lot of trial and error involved, as well, which is distinctly more nerve-wracking than following a set procedure.  On the other hand, taking notes and modifying what we've been given is a very exciting process!  It's cool that we can somewhat customize this research experience - from the number of Keck clips we use on our apparatuses to the compounds we've selected to study.

Monday, January 14, 2013

Day Eight: I Had to Wear Legit Goggles

Because the alkyl halide used in forming my Grignard reagent is benzyl chloride:


To the observer who has not taken organic chemistry, this structure means very little and certainly couldn't be dangerous, if it's been entrusted to college students.  In actuality, benzyl chloride is an incredibly volatile liquid that doesn't mind becoming airborne as a vapor.  When that happens, it's very easy for this vapor to localize on one's eyes and cause an irritation - hence, it is called a lachrymate.

Unfortunately, benzyl chloride also reacts very willingly with water to form an alcohol.  One of water's protons is released during this process and can react with the chloride anion that resulted from the substitution.  Hydrogen + chloride = hydrochloric acid...a dangerous chemical to have in one's eye.

For this reason, any time that I worked with benzyl chloride, I kept the fume hood mostly closed and wore legitimate laboratory goggles for protection, rather than glasses.

Aside from that, the Grignard reflux was fairly straightforward.  Granted, every piece of glassware had to be dried in an oven at 100 degrees Celsius for an hour to remove any excess water, but once set up, we were able to mix the alkyl halide with magnesium and ether to form the Grignard agent and then add cyclohexene oxide for the Grignard reaction.

We'll find out how it went when we characterize our products tomorrow!

Sunday, January 13, 2013

Day Seven: LOTS of Separations

This post is two days late, for which I apologize.  Everything that follows is written from Friday's point of view.

I never knew before this morning that so many different separations could take place to isolate an organic product.  We treated the solution that had been stirred overnight with three solids: sodium bisulfite to reduce the oxidizing agents, bleach and m-CPBA; sodium bicarbonate to neutralize the carboxylic acid formed in the reaction; and sodium chloride to extract any remaining water from the dichloromethane component of the solution.  The process involved a good number of runs through the separatory funnel and one vacuum filtration, and some of the layers looked rather interesting:


There were originally three layers in this particular separation.  The portion of the solution that resembles a cloud was in-between the organic and aqueous layers.  We believe that this center layer formed because the composition was both dichloromethane- and water-soluble, so the cloud was trying to exist in both layers at once.  By the time we performed the last separation, only two layers remained.  The organic solution was left to dry with sodium sulfate and will be characterized on Monday.


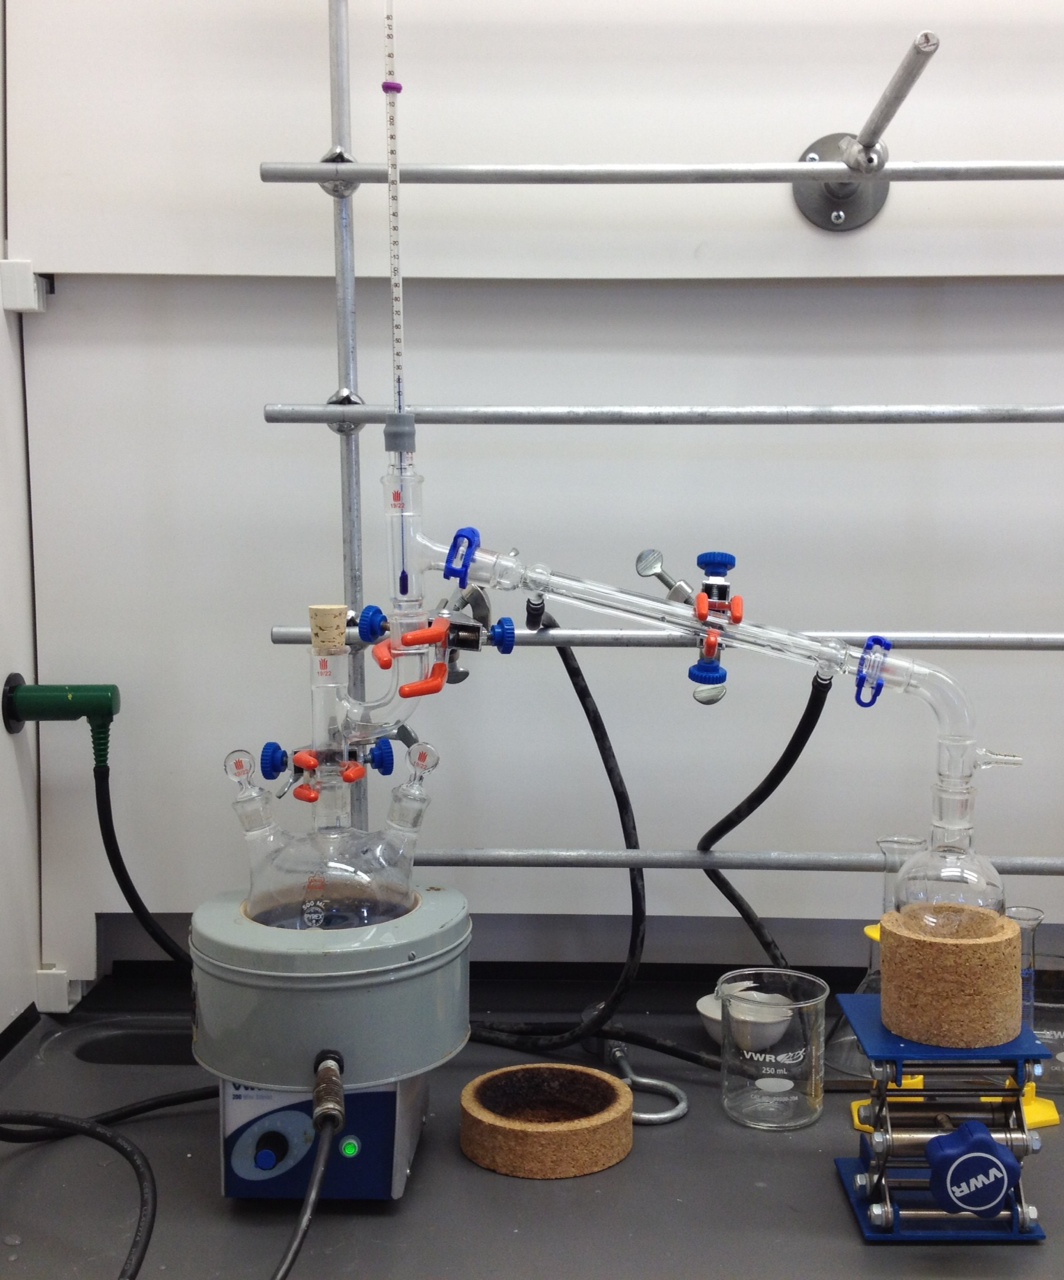
Additionally, we began to make preparations for our Grignard reaction of cyclohexene oxide, which will also take place on Monday.  We distilled "anhydrous" ether over a period of about four hours in this rather impressive apparatus:

We used a 5-L three-necked round-bottomed flask, a condensation column, a distilling head, a West condenser, a vacuum filter, and three receiving flasks, two of which were 1-L teardrop-shaped flasks.  Our apparatus also included a coiled copper tube immersed in ice to ensure that the water entering the condenser was as cold as possible.  This tube, along with the condensation column, was important to be sure that only ether and not water was distilling into the receiving flask.  We will use this more anhydrous ether to make our Grignard reagent.


Hopefully soon, I will provide on this blog the procedure used for the Baeyer-Villiger oxidation and the reference for our standard workup.  Enjoy the rest of the weekend!

Thursday, January 10, 2013

Day Six: Tying Loose Ends

Time can be very valuable if it is used to wrap up one project and make preparations for the next one.  Today, my group tested our individual cyclohexanone samples from the oxidation experiment, performed the next portion of the Baeyer-Villiger oxidation, and set up the apparatus for a Grignard reaction.

From the IR spectrum of my cyclohexanone sample, the OH peak has significantly reduced from the last experimental run.  Since the GC suggests that no more cyclohexanol remains in the solution, we suspect that there is still water in the system or that some the cyclohexanone has been converting to its enol form.  We will extract the liquid from the vial containing drying agent prior to our next run of the Baeyer-Villiger reaction.

The workup following the Baeyer-Villiger reflux involved transferring the contents of the reaction flask to an Erlenmeyer flask, using 30 mL of dichloromethane to make a qualitative transfer.  After that, the solution was left to stir with 30 mL of water.  Adding  0.15 g of sodium bisulfite and 10 mL of 10% sodium bicarbonate solution formed two separate layers in the reaction mixture after vigorous fizzing.  We will complete the reaction tomorrow, once the mixture has been stirred through the night.

The apparatus we set up is, in one word, AWESOME, and I will post a picture of it tomorrow...brace yourselves....

Wednesday, January 9, 2013

Day Five: Multi-tasking

It was one of those days that I arrived at 8 a.m. and monitored as many as four processes at once.  That isn't to say that I didn't enjoy the work; I love being in the lab and performing reactions that I understand on a basic level.  I am, however, quite tired and hopeful that today's experiments will yield good results tomorrow.

I began my day setting up a simple reflux apparatus for the addition of m-CPBA to cyclohexanone in dichloromethane:


Originally, Dr. Bass and I added heat to the reaction flask and deposited the m-CPBA solid through the West condenser.  On review of the procedure, however, we realized that the m-CPBA was to be added prior to setting the heat.  We also found that the solid tended to clump inside the condenser, though we were able to force the solid through by adding more dichloromethane.  The next time we run this reaction, we will add the solid straight to the reaction flask rather than through the narrow tube.  This mixture was left to reflux until about 5:00 this afternoon.

My second reaction was the re-run of the oxidation of cyclohexanol.  Following my notes from the previous day made adjusting the reaction conditions much easier, so that the solution stayed within the proper temperature range the entire time that bleach was being added dropwise.  Actually, the bleach was sufficient to maintain the heat without a mantle, and I removed the outside heat source once the mixture reached 40 degrees, even though that slowed the overall process.  I also used two 80-mL portions of bleach instead of 72-mL.

In the case that bleach was in excess, I prepared 100 mL of saturated sodium bisulfite solution, just as I did the other day.  This reaction was performed during the 20-minute stirring period after the addition of bleach was complete.

Halfway through the experiments, after the 20 minutes, I prepared a GC sample to test for unreacted cyclohexanol.  I extracted a 2-mL sample from the reaction flask into a small Erlenmeyer flask.  A potassium iodide starch paper test revealed that the sample contained excess bleach, so I added a few drops of the prepared sodium bisulfite to neutralize it.  Afterwards, I transferred the sample to a vial and added 2 mL of ether, capping the bottle and shaking until two separable layers formed.  The top (ether) layer was extracted into another vial, and ether was added by the same procedure as yesterday.

The GC scan confirmed formation of cyclohexanone and absence of cyclohexanol, signifying a complete reaction.  (YAY.)

The rest of the experiment proceeded as modified after the first run, except for one key point.  After the addition of solid sodium chloride on Monday, some of the salt crystals transferred into the separatory funnel and clogged the stop-cock area.  To avoid this, I performed a vacuum distillation of the salted solution to extract the hydrated crystals and be left with two clean layers.  Extracting the organic layer was much simpler, and it is being left to dry with solid magnesium sulfate.

Tomorrow's focus will be characterization of the product and a closer look at the Baeyer-Villiger oxidation!

--

Now, for your viewing pleasure: what chemists do before, during, and after reactions...multiple times...sometimes more often than actually running experiments.


In case anyone wondered, we wash glassware.  A lot.  My roommates wonder why I put off washing dishes after a meal.  It's just a reality of the industrial and researching world that I will enjoy for quite awhile.

Tuesday, January 8, 2013

Day Four: Characterization

Today's primary objective was characterization of our cyclohexanone samples.  We began with IR scans, since we are more familiar with the technique.  The scan showed a clear carbonyl peak near 1700 cm-1, which confirmed the formation of a C=O functional group; however, a prominent OH peak was present at 3500 cm-1.  Initially, we assumed that the product had not finished drying and added extra drying agent to our samples for about half an hour.

To determine whether the peak was due to excess water or unreacted cyclohexanol, we prepared samples to test by gas chromatography in the following steps:
  1. Insert a glass pipet into the liquid product to extract a small amount (just a tip-full)
  2. Fill a plastic pipet with ether solvent
  3. Push the ether through the glass pipet so that a mixture of product and ether collects in a sample vial
The gas chromatogram displayed an ether peak between 1.28 and 1.36 minutes, which accounted for nearly 100% of the peaks registered.  A cyclohexanol peak appeared between 2.65 and 2.76 minutes, while a cyclohexanone peak appeared between 2.76 and 2.84 minutes.  The cyclohexanone peak was only five times greater than the cyclohexanol.

Based on these results, we decided to perform the oxidation reaction again tomorrow.  We plan to use fresher bleach reagent and attempt to better stay within the desired temperature range of 40-45 degrees Celsius.  Because my temperature dropped below 40 degrees for longer than ten minutes, I believe that my reaction rate slowed over the 30-minute reaction period such that the reaction did not proceed to completion - hence the need for sodium bisulfite to neutralize the unreacted bleach.

Additionally, we plan to begin a Baeyer-Villiger oxidation reaction of standard cyclohexanone tomorrow.  From the procedure given by Dong Tian, et. al. (see below), the cyclohexanone, m-CPBA, and dichloromethane reagents will be in reflux for 15 hours, so we will start the process early in the morning and spend the rest of the day with the regular oxidation reaction.

Here's to another day of research, hopefully with fewer set-backs!


--
References:
Tian, Dong, Philippe Dubois, Christian Grandfils, and Robert Jerome.  "Ring-Opening Polymerization of 1,4,8-Trioxaspiro[4.6]-9-undecanone: A New Route to Aliphatic Polyesters Bearing Functional Pendent Groups."  Macromolecules 30 (1997): 406-409.  Print.

Monday, January 7, 2013

Day Three: Practice Reaction

There are days that I wonder if I truly want to pursue chemistry as a profession.  Then there are days like today that confirm how much I LOVE working in the lab.  My group performed our first reaction today: the oxidation of cyclohexanol to cyclohexanone, given by the procedure in Mohrig's Modern Projects and Experiments.  The first portion of the reaction, including set-up, lasted about three hours; the second portion took another three hours.  We had a very productive day!  (Thank goodness for 96.1 FM!)

The apparatus for the first portion was designed to measure temperature, add reagent dropwise, and prevent evaporation by keeping part of the flask cool.  Our assembly of three-necked round-bottomed flask, thermometer (right), addition funnel (left), and West condenser (center) is shown below:


The flask was set in a heating mantle mounted atop a stirring motor.

The objective was to add approximately 150 mL bleach to the reaction flask of cyclohexanol and acetic acid over a period of 30 minutes...while maintaining a temperature between 40 and 45 degrees Celsius.  Our biggest struggle during this reaction was staying within those boundaries.  Fortunately, we picked up a few tips along the way that will help when we repeat this reaction with our own compounds.

We found that setting the heating mantle to level 20 (out of 100 - slightly ambiguous) and lowering the heat to level 5 once reaching the desired temperature range was the best method for regulating temperature.  Increasing the addition rate of bleach is helpful in reaching this temperature range more quickly.  Additionally, when the liquid mixture temperature exceeded 45 degrees, moving the flask to an ice water bath for no longer than ten seconds was sufficient to return to the temperature range without significantly dropping in temperature.  (A temperature lower than 40 degrees could slow the reaction rate and lower percent yield of the final product.)  After the 30-minute addition period, the mixture is left to stir for 20 minutes at maintained heat, during which time the solution forms a foamy, yellow-colored ring at the surface.

Another small set-back occurred when we realized that we didn't have the necessary saturated sodium bisulfite solution to neutralize the excess bleach.  The solubility of sodium bisulfite crystal is 42 g / 100 mL, and we decided to prepare a 50-mL sample in a small flask by swirling.  For the next run-through, we plan to prepare this solution during the 20-minute stirring period.

Adding thymol blue indicator turned the entire solution a golden yellow.  About 17 mL concentrated sodium hydroxide were required to reach pH 9, at which time the solution had become royal blue in color.

For the second portion, a simple distillation apparatus was assembled, this time incorporating a Claisen adapter, a distillation head, and a small round-bottomed receiving flask:


The objective was to separate the organic cyclohexanone product by steam distillation.  Interestingly, because so much water is produced during this reaction, an azeotrope of cyclohexanone and water forms with a boiling point of 95 degrees Celsius.  This is primarily due to hydrogen bonding between the two compounds.  Once this azeotrope is distilled into the receiving flask, solid sodium chloride is added to attract the water away from the cyclohexanone and form a more distinctive aqueous layer for separation.

Though this process should have been simple and straightforward, we encountered trouble during the drying process.  Some salt remained in solution, so while the drying agent was effective in removing the water, the organic solution was not pure.  We solved this issue by pipetting the liquid into a glass pipet stuffed at the bottom with cotton - the cotton allowed the pure liquid to seep through but captured the salt.  After the liquid was transferred into a sample vial, we added more drying agent and left the product to sit overnight.  We will characterize our product in the morning.

Overall, I am optimistic about tomorrow's results and have enjoyed the process thus far.  I will be interested to see how the reaction proceeds when I test my own compound.